BIGGEST NEWS EVER!!
The Mountain States R2 Droid Club now has a new home at www.msr2droids.com!! We also have a facebook page, so come Like us! Check out our new website for news on where the droids will be next. You can even post up pictures of our droid, meet the droid builders, and join in discussions on our forum. Happy Days Are Here Again!!
I seemed to have skipped putting AL's schedule on the left hand side for 2013 (it's been a very busy year at work), but I promised a lot of people I would post 2014. As always, the schedule is subject to change due to work, illness, weather, called to duty on the Death Star, etc.
Galaxyfest, Feb 21-23, 2014, Antler's Inn, Colorado Springs, CO
Sun City Scifi, Mar 14-16, 2014, El Paso Convention Center, El Paso, TX
May the Fourth, May 4, 2014, Wings Over the Rockies Museum, Denver, CO
Denver Comic Con, June 13-15, 2014, Denver Convention Center, CO
Britishfest, June 28-29, 2014, Comfort Inn and Suites, Omaha, NE
(I might just bring the mouse droid for that, but I'll be doing the 007 panels and party)
Rocky Mountain Con, October 2014, Crowne Plaza DIA, Denver, CO
There will probably be other events but I don't have dates for those yet. I'll post up when a new one comes along. Due to logistics with May the Fourth events, AL will probably not be out for Free Comic Book Day (again I might bring the mouse droid for that).
Please feel free to contact me before hand to make sure AL will actually be at an event.
Until next time,
Jawa Jaka (busily cramming her calendar with cool events)
Tuesday, November 19, 2013
Wednesday, November 6, 2013
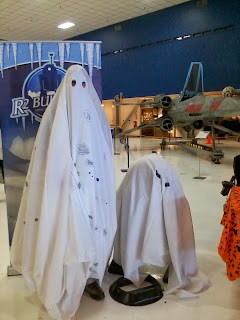
Hauntings at the Hangar
WOW!! It's been awhile since I've blogged (I miss blogging). Stupid facebook getting in the way of my blogging! LOL Anyway here are a few pics of the droids at Hauntings at the Hangar, Oct 27th, 2013:


AL in his kid Vader costume, inspired by a couple dozen little boys in the same costume at Boo at the Zoo at Cheyenne Mountain Zoo.

Next year Coke Zero???

Dave! or is it Kevin? I can never remember.

Goldie says BOO!! It was an impromptu costume cutting holes in our personal tablecloth.

Goldie shares a moment with another sheet (friend).

The Jawa Candy Dish from Spirit Halloween store, with Crowina the Carrier Crow.

Speeder Mater was a HUGE hit!! And most everyone got it!

Fraggle Rock meets Star Wars meets Minions. Kudos to a well done mashup.

Vader was a hot costume for boys, both human and mechanical, this year.
AL and his friends can't wait until next year to do it all again. So, what would you like to see AL dressed up as next year?
Until next time,
Jawa Jaka (playing dress up with the droids)
Friday, April 26, 2013
The Astromech Action Figure Collection
A few of us in our garrison have collected astromech action figures, including myself. I've been collecting for about four years now and have a pretty good start. Here are a couple links to droid action figure lists:
http://donsolo.wordpress.com/
http://www.rebelscum.com
Google Docs List
http://astromech.farbauti.de/ (added after initial post)
And now pics of my collection so far:
I found some bamboo desk dividers with ends that slide out at Big Lots a couple years ago. Droid figures fit in it perfectly. I'm intending to add a couple more "shelves" on the left side so it matches the right side. I also want to add some sort of plexiglass covering for convention display purposes. I have a third divider somewhere that I can add more figures (just have to find a place to hang it, not much room next to these guys).


Here are a few of my unopened ones. The rest are scattered throughout the house and a few, like my most wonderful R2-KT are still in AL's bin in the car. I currently have strep throat and a humongous sinus infection and way too sick to get anything out of the car at the moment. So, you have to trust me when I say I have more battle packs, Entertainment Earth collections, and single carded figures floating around.

I've included my R2 light set (I have two packages of these for my RV), the tiny R2 at the right is my rubber stamp from 1982 (a stocking stuffer from Mom to Dad), the rare McQuarrie concept is in the middle, and on the left is my very first action figure of any kind ever! I found Leia and R2 pack at the flea market for $7. I talked him down to $5 and now this pack is hard to find. I scored big time and didn't even know it!! Yep, that little find started me on the action figure collecting craziness. Just droids and jawas for now, even though I have a few Maul's, stormtroopers, and one officer.

The tiniest action figures -- Micro Machines! Found this for a song at last year's Denver Comic Con. The seller held it for me for two days until I could get to his booth. I have great friends, don't I?

Some of my other droids and jawas. Someday I want to make the big green guy lower left corner.

Until next time,
Jawa Jaka (happily playing with her dolls while coughing up gunk)
As soon as I posted this a friend of mine found another great resource list:
Monday, March 18, 2013
And my Kilted Trooper!
I almost forgot to post my Kilted Troope outfit from the St. Pat's parade. I hand made my kilt with black and white tartan plaid. The extra fabric from the bottom became my sash with my dad's real four-leaf clover in-a-pin holding my sash together.
 Until next time,
Jawa Jaka (going green, black and white style!)

Jawa Jaka (going green, black and white style!)
IN tunic front panel mockup
After a long St. Pat's weekend that included finishing a kilt, helping on a float, marching in a parade, and eating lots of pizza at Beujou's with good friends, I decided to take a break from my hectic life and work on the IN tunic mockup. So, here's what I did tonight while watching LOTR/Two Towers for the umpteenth time.
First I got out my muslin. People ask me what kind of muslin I use, and it's a doozy. I have hundreds of padded packing paper from seven years ago when my parents passed on. I just rip the brown paper off and I get lots of blue thin fabric that works quite well. Ask your local moving companies/uhaul/PODS/etc for some padded paper. It'll cost you some, but it's cheaper than what you can get at a fabric store. Or use any old sheets/curtains/etc. Remember, it's going to be tossed out eventually.
Now on to the fun stuff.

This is based on a regular IO front panel. You'll need to adjust and measure this piece on your body using CharToraz's tutorial. You'll also need to take the right side of the neck line and make a straight edge from center to about one inch below your right shoulder. In this pic I labeled the panels backwards but the end results are the same. R will actually go over your left shoulder and L will go just under your right shoulder seam.

From the point where the neck curve becomes straight draw a straight line to the bottom edge somewhat parallel to the right edge. Cut on this line to make R. Measure two to three inches from the left edge at both top and bottom. What ever measurement you decide to use it must be the same at top and bottom. Draw a straight line and cut to make L. The middle piece is automatically magic!
These three pieces will be the basis for your pattern pieces. Take another large piece of muslin and pin R and Mid on it. Cut at least one inch on the sides you cut in the previous step. This will give you seam allowance and some extra to adjust for that taylored look (it's always better to cut bigger than smaller!).

For L fold your muslin giving yourself at least one inch extra on the short side. Lay the long side of L on the fold and cut on the extra inch for seam allowance and adjustments.

As a long-time quilter I like to use a straight edge and rotary cutter. If you don't have those please try to cut as straight as possible. Tip: you can use any ruler or straight edge like a piece of paper and cut outside the edge. This will help you get a nice clean cut.

At this time you'll have three larger pieces that looks something like this. L is unfolded in this pic. Sew R to Mid, then the unfolded L to Mid.

This is what it will look like after sewing the three pieces together.

This is a close up of the top neck line. Notice the pointed shape of the unfolded L.

This is what you'll get when you fold L under. L will get some light batting and then whipstitched into place on the back. I'll have pics of that process later (when I get to that part).
Again, I had you all cut the pieces a little big for any adjustments. I already had to adjust the Mid section a little for the L seam (my Mid was a smidgeon too large). You'll probably be trimming off a little here and there when you get it fitted on the rest of the tunic.
Until next time,
Jawa Jaka (Battle of Helms Deep is still going on! What a long movie battle!)
Wednesday, March 6, 2013
Navy Trooper boots
I think I found the boots for the IN on ebay.uk. They have a size 7 which will work (my shoe size is 6.5 ladies). Granted they are replicas but they're the right ones with a top buckle and gusset. A friend of mine got the real thing for much cheaper, so I'm going to see what his looks like and if they have small sizes ($45 for real ones versus $90 for replicas from England).
1Bfg~~_3.jpg)
I'll be making the tunic mockup this weekend. I'm totally going nuts on this, but I'm determined to get a level 3 (L3) on the IOC out of this.
Until next time,
Jawa Jaka (with small feet)
1Bfg~~_3.jpg)
I'll be making the tunic mockup this weekend. I'm totally going nuts on this, but I'm determined to get a level 3 (L3) on the IOC out of this.
Until next time,
Jawa Jaka (with small feet)
Saturday, March 2, 2013
ANH Navy Trooper part 2
So, after today's MDA troop (which was a blast), and after finishing my kilt, I got back to work on the tunic. Here's a drawing I did of how I'm going to change the front panel, along with some notes. I'm hoping to make better drawings of this, but at least this is a starting point.

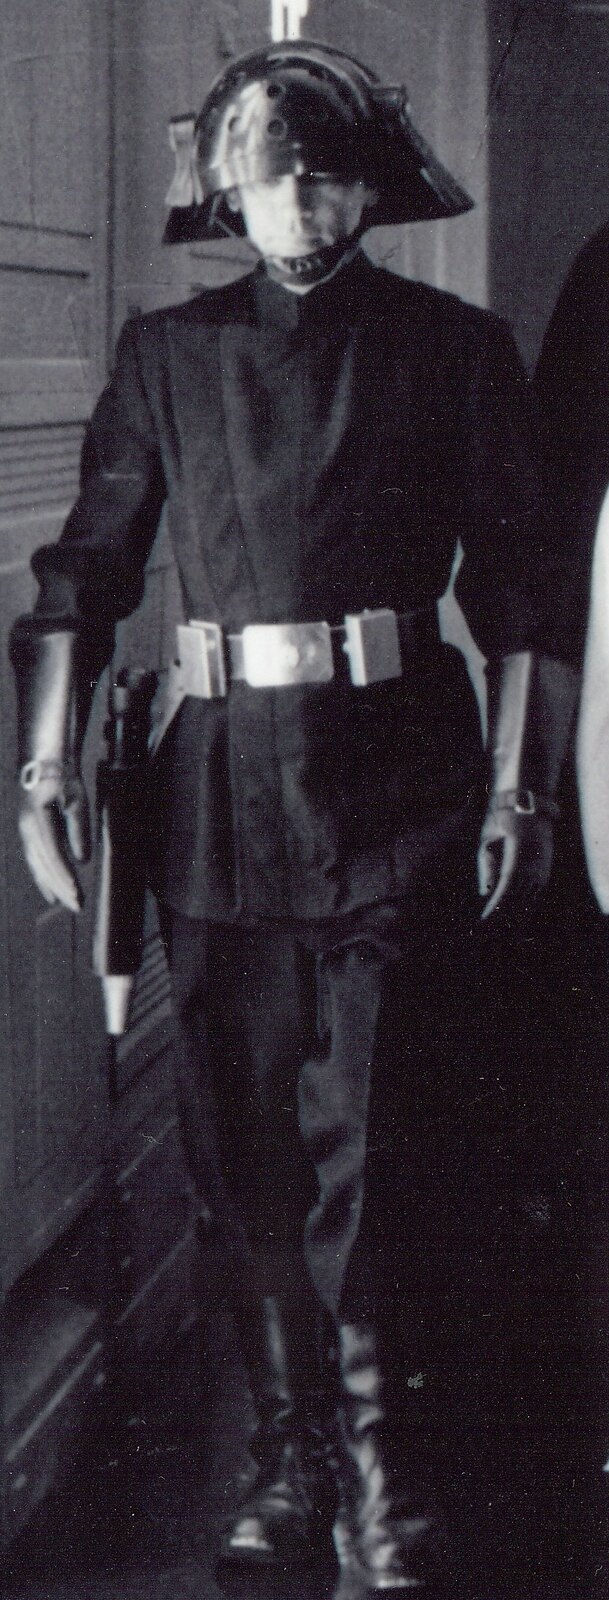
Here is a pic of my IN as of today at the MDA troop (second from left). It's just my IO tunic with no rank badge.

Until next time,
Navy Trooper Jawa Jaka
Here is a pic of my IN as of today at the MDA troop (second from left). It's just my IO tunic with no rank badge.
Until next time,
Navy Trooper Jawa Jaka
New ANH Navy Trooper
I've been issued a challenge to create a tutorial for the ANH Navy Trooper costume. It seems you can no longer wear an IO with a helmet and belt boxes and call it a day (which is what I did). I'm going for the new Level 3 (L3) super accurate costume. I've already ordered my metal belt boxes (no plastic for L3), found a source on ebay.uk for the correct boots with straps/gussets, and sent an email to the only person I know making gauntlets for small hands. As soon as I get all the details ironed out I'm going to post the whole tutorial on the Imperial Officers Corp (IOC) website. Unfortunately, AL will have to take a backseat again. Here's the first installment:
I found out that a few have made this tunic but no WIP's, pics, or instructions. The IOC CO has asked me to do a tunic tutorial for this particular one. I spent most of the day cleaning out my sewing room so I could find my IO tunic pattern pieces (found 'em). I'm going to start with that, adjusting the front panel, and tapering instead of skirting the bottom part. It looks like there will be a lot of similarities for building both IO and navy trooper, but I'll do my best to write this tutorial from start to finish. This is going to be fun.
First up is buying McCall's pattern #4745 Men's Civil War. It has the best collar and front panel.

We are going to basically use the one on the left with some major pattern adjustments (and definitely not that long, either). Also, if you can find ChazTorad (Chuck Folz) on the IOC for his IO tunic tutorial print that (I have a hard copy of it if anyone wants a copy). It's several files, ignore the dosimeter pocket instructions (no pockets on navy trooper). And don't bother with the skirt portion (we are going to flare it out as one piece for navy trooper). I'm still researching the sleeves as some say it's a standard fitted sleeve, not the IO two piece sleeve (under and over sleeve). If this is true a standard fitted straight sleeve pattern without cuffs will do. Also, the back is one piece, no princess seams or side cut-ins. I'll get pics up as soon as I cut my correct pattern pieces so everyone can see what I'm talking about (most of this info is for experienced costumers).
I also got some black twill on sale at Joann Fabrics ($6.99 a yard with 20% coupon). I bought the last 5.25 yards at my store and got half off for the last .25 yards as end of bolt sale (couldn't they give me half off for all of it since I practically took the whole bolt?). Get enough for pants and tunic so they can be from the same cut of fabric.
Use any plain fitted straight pants pattern that you can find (Simplicity has several for beginners, I think mine is a very old McCall's). Don't use any old black pants that you find in the store as the chances of it matching the tunic are nil. No Jodphurs for this one! I might put a pocket in them so I can carry keys and wallet (although I think converting one of the belt boxes for that would be awesome). Tomorrow I'll be cutting out my pants pieces and putting that together (now that I have the fabric). I won't be giving detailed instructions on the pants, just follow the pattern instructions. When you're finished iron to crease down the front of the legs. Remember, these have to fit into your boots, so no flared-out bell bottoms.
Last thing for tonight's installment of this tutorial (once I'm finished here I'll tweek and transfer the whole shebang to the IOC): Do not buy/make rank badges for this costume. Navy troopers don't need no stinkin' badges.
I found out that a few have made this tunic but no WIP's, pics, or instructions. The IOC CO has asked me to do a tunic tutorial for this particular one. I spent most of the day cleaning out my sewing room so I could find my IO tunic pattern pieces (found 'em). I'm going to start with that, adjusting the front panel, and tapering instead of skirting the bottom part. It looks like there will be a lot of similarities for building both IO and navy trooper, but I'll do my best to write this tutorial from start to finish. This is going to be fun.
First up is buying McCall's pattern #4745 Men's Civil War. It has the best collar and front panel.
We are going to basically use the one on the left with some major pattern adjustments (and definitely not that long, either). Also, if you can find ChazTorad (Chuck Folz) on the IOC for his IO tunic tutorial print that (I have a hard copy of it if anyone wants a copy). It's several files, ignore the dosimeter pocket instructions (no pockets on navy trooper). And don't bother with the skirt portion (we are going to flare it out as one piece for navy trooper). I'm still researching the sleeves as some say it's a standard fitted sleeve, not the IO two piece sleeve (under and over sleeve). If this is true a standard fitted straight sleeve pattern without cuffs will do. Also, the back is one piece, no princess seams or side cut-ins. I'll get pics up as soon as I cut my correct pattern pieces so everyone can see what I'm talking about (most of this info is for experienced costumers).
I also got some black twill on sale at Joann Fabrics ($6.99 a yard with 20% coupon). I bought the last 5.25 yards at my store and got half off for the last .25 yards as end of bolt sale (couldn't they give me half off for all of it since I practically took the whole bolt?). Get enough for pants and tunic so they can be from the same cut of fabric.
Use any plain fitted straight pants pattern that you can find (Simplicity has several for beginners, I think mine is a very old McCall's). Don't use any old black pants that you find in the store as the chances of it matching the tunic are nil. No Jodphurs for this one! I might put a pocket in them so I can carry keys and wallet (although I think converting one of the belt boxes for that would be awesome). Tomorrow I'll be cutting out my pants pieces and putting that together (now that I have the fabric). I won't be giving detailed instructions on the pants, just follow the pattern instructions. When you're finished iron to crease down the front of the legs. Remember, these have to fit into your boots, so no flared-out bell bottoms.
Last thing for tonight's installment of this tutorial (once I'm finished here I'll tweek and transfer the whole shebang to the IOC): Do not buy/make rank badges for this costume. Navy troopers don't need no stinkin' badges.
Sunday, February 3, 2013
Drink Tray Progress
The past two Saturdays I've been up in Loveland at Cal's studio working on the drink tray. There's been progress after a week of sniffing glue and paint. LOL Anyway, here is what I've done this week (two more days to finish, I can do it!)


I primed and painted the greeblies gold... (I kept humming "Goldfinger" during this phase)

all while learning how to use Bondo! I'm soooo proud of myself, I actually learned some prop-making tips from Cal and the gang. Not bad for my first time. Now I have to sand the Bondo to a smooth finish before priming and painting the legs.

While the Bondo and paint were drying, I attached the shelves together using 1/2" aluminum spacers and 1 1/4" 10-32 flat head screws. Didn't need to countersink as the screws fit in tightly and flat. Then I gave the whole top a slight spray of paint to cover the screws and hide any imperfections. Don't need much paint, just a nice back-and-forth spray from about a foot away.

My painting station outside the studio.

After letting the tray dry overnight, I'm gluing on the tray greeblies this morning.
I still have to sand and paint the legs, attach leg greeblies, and attach the tray to the legs. Gotta be done by Tuesday night so I can pack the darn thing Wednesday morning. I should be done in plenty of time since the hard part (all the painting except the legs) are done. Thinking of doing some custion plastic boxes for the trays so I can display some of my droid action figures. Or just put on my dad's ceramic collector Schlitz mugs! Oh baby....
Until next time,
Jawa Jaka (too much glue in my system, taking a break to watch Superbowl!!)
Tuesday, January 15, 2013
Drink Tray WIP
I haven't blogged in so long I almost forgot how to blog! It's been a long time since I've made any progress on AL, but decided to finish his drink tray for Galaxyfest in February. It started with a big box of plastic PVC parts that I had to sort through and seperate. I'm using Alex King's and Jerry Green's blog WIP's to put this thing together.
Glue I'm using for PVC, a little goes a long way. Don't get it on your fingers (I speak from experience):

Lay out the squarish drink parts and label them from left to right (I used 1UP, 2D, 3UP, 4D, etc). There will be two layers you'll have to glue together. Make sure to line up the holes and edges before gluing. You'll have seven of these when done.

I tested some primer and paint on the back of one of them. I figured since it will be hidden from view it didn't matter. There just isn't much scrap in the box to test on. Mark the back side in fourths and try a few primers, let dry, and try some paints.

Here are the paints I settled on. A very white Rust-oleum plastic primer, Rust-oleum hammered brown (didn't quite get the texture on the plastic, but I adore the color), and Krylon metallics gold (shiny!). I really didn't like the copper or other browns/golds I tried. Pick what you like, though.

Next, you'll have another squarish part with frilly doohickies on it. The whole part looks like this, unfortunately I took it apart and painted it before taking these pics. DO NOT take off the tape from the back yet (you might have to peel a little away from the ring to seperate it, though).

Seperate the outer "ring", prime and paint that ring with your chosen color, prime and paint the frilly section. Make sure you paint the inside edges of the ring before gluing it to the main section.

Now you can take the tape off. The circles and "stuff" will fall away easily along with the outer frilly edge.

Completed frilly section. You'll have to prime and paint the edges before gluing into place.

Lay the outer ring onto your main section that you've already glued together. Glue that down. Don't glue the frilly section down yet, I'm just showing you what it will look like when done.

At this point you'll have three layers (without the frilly section). Sand, prime, and paint the edges (I would suggest the same as your main section, but you can be creative). I haven't done this step yet (still waiting for inner edges of rings to dry). This pic is just to show you what it looks like.

So, what do you do with all the frilly section "stuff"? I've put it all in a bowl and will get creative later. I've been reading Foundation again, and thought the big circles would be the great beginnings of a Spaceship-and-Sun badge.

I'll post later the next steps, which is basically gluing down the frilly sections and bolting them all together. Legs will come later. Tip: Don't glue ontop of the holes, you might have to fudge a little.
Until next time,
Jawa Jaka (very happy on glue and paint fumes. LOL)
Subscribe to:
Posts (Atom)


